


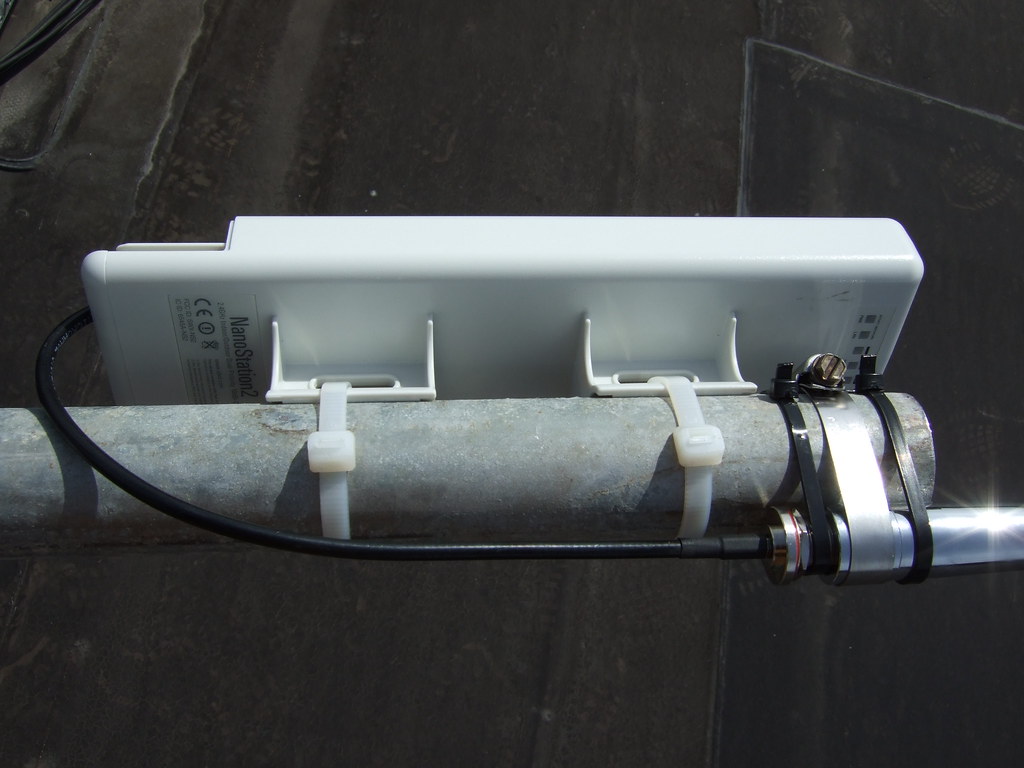
This is inside the room where the poe adapter and power supply is.

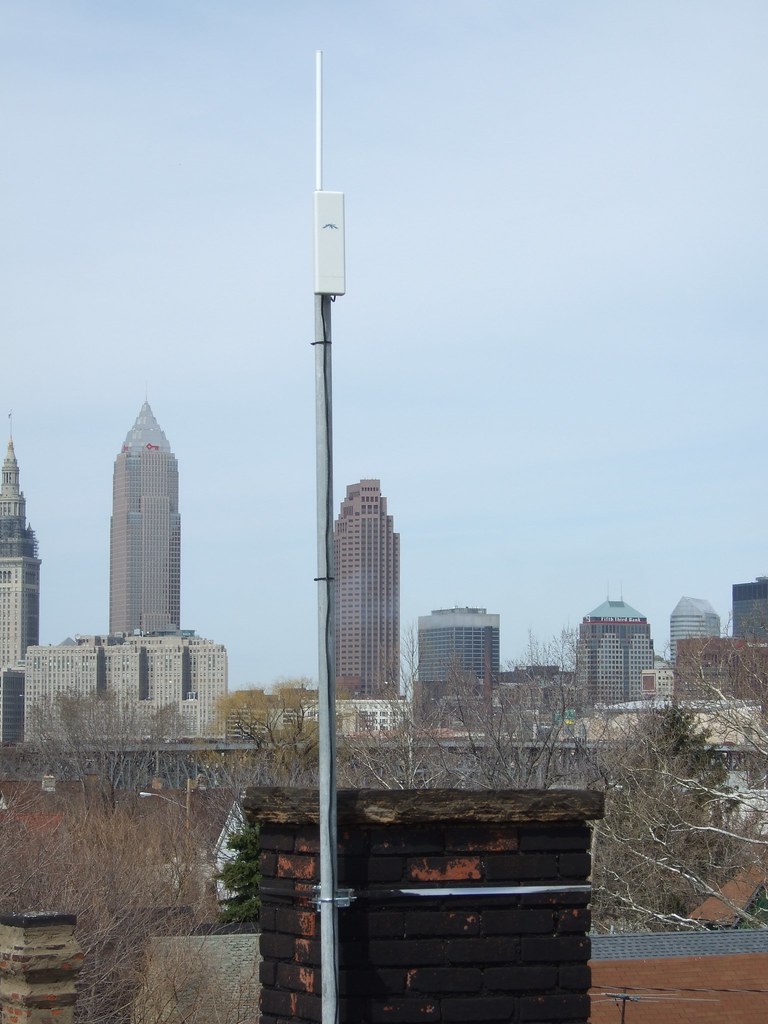
We still have several more NS2's to set up on this block but, for today I am done.
SSID            Type  BSSID                Channel
NETGEAR         BSS   00:22:3f:28:xx:xx    01
PTown           BSS   00:1c:df:ac:xx:xx    06
lindel          BSS   00:06:25:f3:xx:xx    11
Motorola        BSS   00:14:a5:58:xx:xx    09
NEW PHILADELPHI BSS   00:14:a5:98:xx:xx    11
Price Family    BSS   00:1a:70:6c:xx:xx    06
belkin54g       BSS   00:1c:df:3b:xx:xx    01
linksys         BSS   00:14:bf:aa:xx:xx    06
tab488          BSS   00:1e:2a:59:xx:xx    06
wipop528        BSS   00:02:2d:be:xx:xx    01
linksys         BSS   00:18:39:b3:xx:xx    06
belkin54g       BSS   00:11:50:72:xx:xx    11
oarip           BSS   00:0f:66:8e:xx:xx    06
willison        BSS   00:02:2d:2f:xx:xx    04
stephon house   BSS   00:0f:66:19:xx:xx    07
joanne          BSS   00:1c:10:4d:xx:xx    06
root@OpenWrt:~# cat /etc/config/wireless

config 'wifi-device' 'wifi0'
 option 'type' 'atheros'
 option 'maxassoc' ''
 option 'distance' ''
 option 'diversity' ''
 option 'txantenna' ''
 option 'rxantenna' ''
 option 'disabled' '0'
 option 'antenna' 'external'
 option 'country' '0'
 option 'channel' '01'
 option 'hwmode' '11bg'

config 'wifi-iface'
 option 'device' 'wifi0'
 option 'encryption' 'none'
 option 'bssid' ''
 option 'server' ''
 option 'port' ''
 option 'hidden' '0'
 option 'isolate' '0'
 option 'bgscan' '0'
 option 'frag' ''
 option 'rts' ''
 option 'wds' '0'
 option 'key1' ''
 option 'key2' ''
 option 'key3' ''
 option 'key4' ''
 option '80211h' ''
 option 'compression' ''
 option 'bursting' ''
 option 'ff' ''
 option 'wmm' ''
 option 'xr' ''
 option 'ar' ''
 option 'turbo' ''
 option 'macpolicy' 'none'
 option 'maclist' ''
 option 'ssid' '****06'
 option 'mode' 'ap'
 option 'txpower' '16'
 option 'network' 'lan'

config 'wifi-iface'
 option 'device' 'wifi0'
 option 'hidden' '0'
 option 'encryption' 'none'
 option 'ssid' '****mesh'
 option 'bssid' ''
 option 'mode' 'adhoc'
 option 'server' ''
 option 'port' ''
 option 'isolate' '0'
 option 'bgscan' '0'
 option 'frag' ''
 option 'rts' ''
 option 'wds' '0'
 option 'key1' ''
 option 'key2' ''
 option 'key3' ''
 option 'key4' ''
 option '80211h' ''
 option 'compression' ''
 option 'bursting' ''
 option 'ff' ''
 option 'wmm' ''
 option 'xr' ''
 option 'ar' ''
 option 'turbo' ''
 option 'macpolicy' 'none'
 option 'maclist' ''
 option 'txpower' '16'
 option 'network' 'ath1'


root@OpenWrt:~# cat /etc/config/network

config 'interface' 'loopback'
 option 'ifname' 'lo'
 option 'proto' 'static'
 option 'ipaddr' '127.0.0.1'
 option 'netmask' '255.0.0.0'

config 'interface' 'lan'
 option 'proto' 'static'
 option 'macaddr' ''
 option 'ip6addr' ''
 option 'netmask' '255.255.255.0'
 option 'gateway' ''
 option 'ip6gw' ''
 option 'dns' ''
 option 'ifname' 'eth0'
 option 'ipaddr' '10.0.5.1'
 option 'type' 'bridge'

config 'interface' 'ath1'
 option 'macaddr' ''
 option 'ip6addr' ''
 option 'gateway' ''
 option 'ip6gw' ''
 option 'dns' ''
 option 'proto' 'static'
 option 'ipaddr' '10.0.0.6'
 option 'netmask' '255.255.255.0'

root@OpenWrt:~# cat /etc/config/dhcp

config 'dnsmasq'
 option 'domainneeded' '1'
 option 'boguspriv' '1'
 option 'filterwin2k' '0'
 option 'localise_queries' '1'
 option 'local' '/lan/'
 option 'domain' 'lan'
 option 'expandhosts' '1'
 option 'nonegcache' '0'
 option 'authoritative' '1'
 option 'readethers' '1'
 option 'leasefile' '/tmp/dhcp.leases'
 option 'resolvfile' '/tmp/resolv.conf.auto'

config 'dhcp' 'lan'
 option 'interface' 'lan'
 option 'start' '100'
 option 'limit' '150'
 option 'leasetime' '720m'
 option 'ignore' '0'

config 'dhcp' 'wan'
 option 'interface' 'wan'
 option 'ignore' '1'
 option 'start' ''
 option 'limit' ''
 option 'leasetime' ''

config 'dhcp'
 option 'interface' 'ath1'
 option 'ignore' '0'
 option 'start' '100'
 option 'limit' '100'
 option 'leasetime' '400m'
root@OpenWrt:~# ifconfig br-lan 192.168.1.4
root@OpenWrt:~# echo "src X-Wrt http://downloads.x-wrt.org/xwrt/kamikaze/8.09/atheros/packages"
root@OpenWrt:~# opkg update

root@OpenWrt:~# opkg remove -recursive luci-*

root@OpenWrt:~# opkg update
root@OpenWrt:~# opkg install webif